Linux Advanced
"As a curious and driven student, I'm passionate about exploring the intersection of technology and innovation. Currently, I'm delving into the worlds of DevOps, Cloud Computing, and Artificial Intelligence/Machine Learning (AI/ML). With a keen interest in streamlining processes, optimizing systems, and harnessing the power of data, I'm dedicated to developing expertise in these cutting-edge fields. Through continuous learning and hands-on experimentation, I aim to unlock new possibilities and drive meaningful impact in the tech landscape."

I] TOPICS COVERED
User and Groups
File Permissions
SSH, SCP, System Ctl
Grep, awk, Sed , Find
Volume Mounting
[!When we create any file in Linux and list its detailed information we get]
-rw-r--r-- 1 username groupname 1234 Jan 01 12:34 file.txt1] The first character indicates the type of file:
-: Regular filed: Directoryl: Symbolic link2] The next nine characters represent the file permissions, divided into three sets:
rw-(read and write permissions for the owner)
r--(read-only permissions for the group)
r--(read-only permissions for other users)
x-- (execute permission)3] Number of Hard Links (
1)4] Owner
username5] Group
groupname6] File Size in Bytes
7] Last Modification Date and Time
8] Name of the File
1] Users and Groups
- In Linux, users and groups are essential for managing system security and resource allocation. Every user has a unique identity, and users can be grouped together to simplify permission management.
-> User Accounts
Each user in Linux is identified by a unique username and user ID (UID). User accounts can be classified into three types:
Root User: The superuser with unrestricted access to the system. The root user can perform any task.
System Users: Used by system processes and services. These accounts typically do not have login privileges.
Regular Users: Created for human users, with varying levels of access and permissions.
-> User Management
Managing users involves creating, modifying, and deleting user accounts. Let's look at the commands and files involved in these tasks.
Creating and Deleting Users -> The
useraddcommand is used to create new user accounts: ==sudo useradd username\==\==
sudo passwd username\==-> Thepasswdcommand sets the password for the new user.To delete a user, we use the
userdelcommand: ==sudo userdel username\==To Modify User accounts we use ->
usermodcommandThe
usermodcommand is used to modify existing user accounts. For example, to change a user's home directory:sudo usermod -d /new/home/directory username\==You can also use
usermodto add a user to a new group:sudo usermod -aG groupname username\==\==To change a user’s primary group:
sudo usermod -g newgroup username\==
cat/etc/shadow: Stores encrypted user passwords.
When you finish adding users and now want to see the users which you have added we can use ==
cat /etc/passwd\== command . This file is crucial as it contains information about all the user accounts on the system. Each line in this file represents a single user account and follows a specific format, with fields separated by colons (:).\By default when we open Ubuntu the default user uses shell -> bash
Whereas the other user that we create uses shell -> sh
Example ->

-> Group Management
Groups are collections of users. Each group is identified by a unique group name and group ID (GID). Groups help manage permissions for multiple users efficiently. For example, you can assign file access permissions to a group rather than to each user individually.
Whenever we create a user an user group is also created.
The
groupaddcommand creates new groups:- \==
sudo groupadd groupname\==
- \==
To delete a group, use the
groupdelcommand:- \==
sudo groupdel groupname\==
- \==
When you run the
cat /etc/groupcommand in a Linux terminal, it displays the contents of the/etc/groupfile. This file contains information about the groups on the system. Each line in this file represents a single group and follows a specific format, with fields separated by colons (:).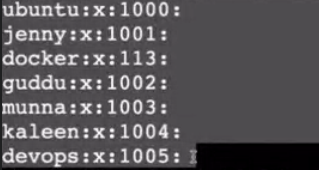
Here's an example entry from the
/etc/groupExample ->
developers:x:1002:alice,bob,charlieGroup Name:
developersPassword Placeholder:
xGroup ID (GID):
1002Group Members:
alice,bob,charlieIn this example,alice,bob, andcharlieare members of thedevelopersgroup.Adding a User to the Group
To add a user to a group, you can use the
gpasswd -acommand followed by the username and the group name.\==
sudo usermod -aG groupname username\==\==
sudo gpasswd -a username groupname\== -> This adds a single user to groupTo add multiple user to a single group we can use:
sudo gpasswd -M user1,user2,user3 groupname
Removing the User from the Group
- \==
sudo gpasswd -d username groupname\==
- \==
To Change the group of file we use:
- \==
sudo chgrp groupname filename.txt\==
- \==
2] File Permissions
1.read(r)
2.write(w)
3.execute(x)
Now the default permission when we create a file or directory is ==
-rw-rw-r--\==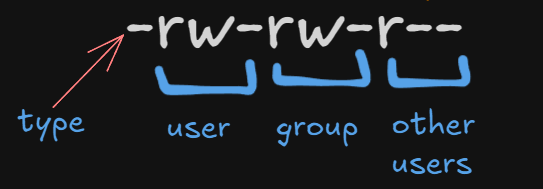
List of all possible Permissions.
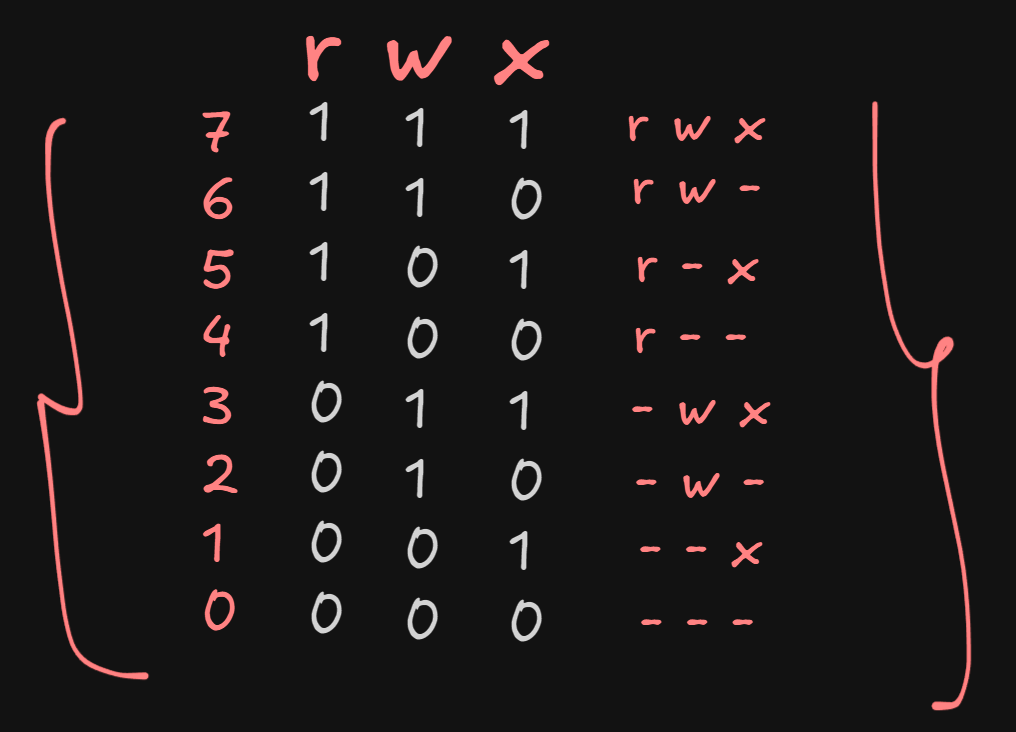
Now giving numbers to the default permission we get.

Now if we want all users to have read, write and execute permissions (rwx) then we can use :
chmod 777 filename.txthere chmod command is used to change access and permissions.
777 indicates code to grant 7(r,w,x) to all users.
The table given above can also be linked with the binary numbers like
Binary of 7 is 111 -> this means (rwx)
Binary of 6 is 110 -> this means (rw-)
Binary of 2 is 010 -> this means (-w-)
3] SSH, SCP, System Ctl
SSH ->
It stands for Secure Shell.
It is a protocol that provides a way to access a remote computer over an insecure network.
It also encrypts the connection, ensuring that data sent over the network is protected.
Its basic use is to connect to a Remote server.
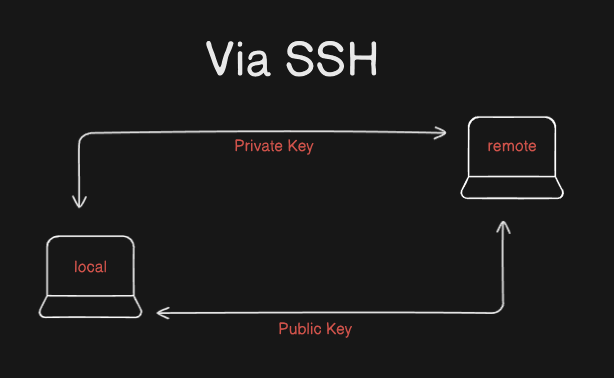
For a SSH connection to establish we need keys that are Private and Public Key.
For a local machine (A) to connect to remote machine (B) , machine (A) should have Private Key and machine(B) Should have Public key.
When both these keys match (authentication) connection is established.
example -> ram -> hanuman(with pvt key) -> sita (public key)
Connecting To a Remote User via SSH from Local Machine (Using MobaXterm)
Create a AWS EC2 instance
After the instance starts running, click on instance and click connect.
Go to SSH client.
Open an SSH client.
Locate your private key file. The key used to launch this instance is devops-prac.pem
Run this command to change the file permission such that only user can read ->
chmod 400 "devops-prac.pem"Connect to your instance using its Public DNS:->
ec2-44-204-50-8.compute-1.amazonaws.comFinal Command which you will enter in the SSH client is :
->
ssh -i "devops-prac.pem"ubuntu@ec2-44-204-50-8.compute-1.amazonaws.comwhere
-istands for path and ubuntu is user.Finally Connection is Established!!
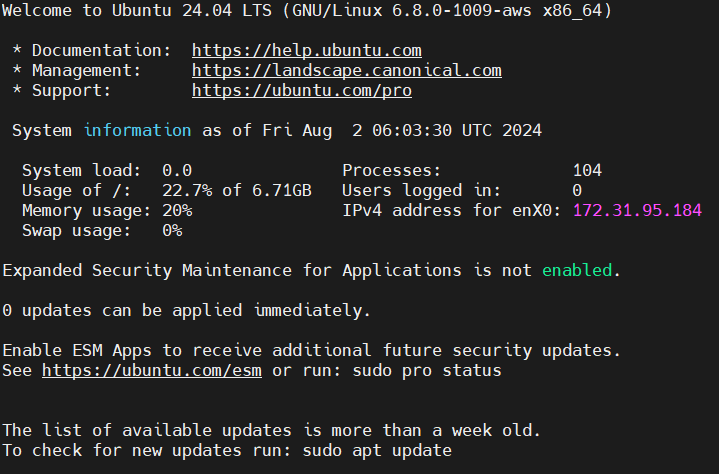
To connect via SSH from one machine to other.
First create two AWS EC2 instances. example- devops1 and devops2.
We are trying to connect to devops2 from devops1, therefore we need private key for devops1 and public key for devops2.
Connect to devops1 in SSH client (mobaXterm).
Generating ssh keys with command in devops1 machine :
ssh-keygen-> this command generates ssh keys (both private and public)ssh folder is hidden by default in ubuntu so use the command :
ls -ato list all folders or we can directly usecd .sshcommand to go to ssh folder.After going inside ssh folder we see that the keys are generated (public and private key)
Display the public key with help of command
cat publickeyCopy the public key.
Connect to devops2 machine with help of EC2 connect in AWS.
After connecting open hidden ssh folder -> It contains authorized key file -> open that with the help of
vim authorized keyand paste the public key that you copied earlier from devops1 machine.Now the devops2 machine has public key.
Go to devops1 machine and type command :
ssh -i privatekeyofdevops1 ubuntu@dns of devops2 machineFinally Connection is established.
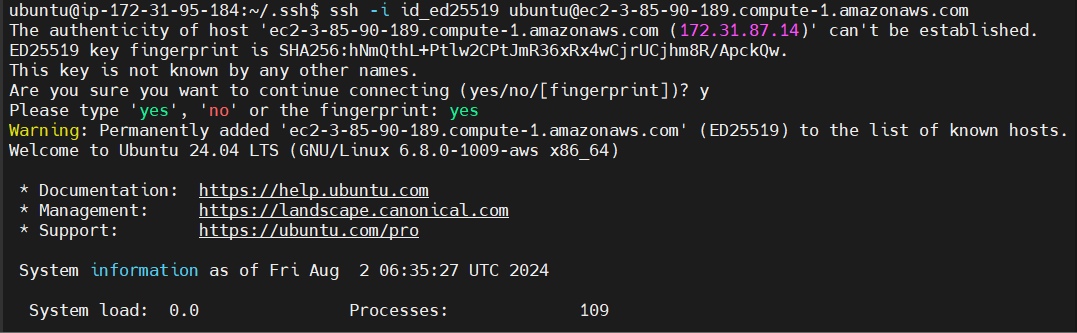
SCP (SECURE COPY PROTOCOL)
SCP (Secure Copy Protocol) is used for transferring files between a local and a remote host or between two remote hosts. It uses SSH for data transfer, ensuring that the files are encrypted during the transfer.
If we want to transfer files from one machine to other machine via ssh we use SCP protocol
Example1 : If we are transferring a file named
test1.csvfrom local machine to remote machine ->scp -i privatekey.pem test1.csv ubuntu@dns_of_remote_machine:/home/ubuntu/ashutest.csvis the local file (Source):/home/ubuntu/ashu-> is the path where the file must be transferred on remote machine.(DESTINATION)
Example 2 : If we have a file named (super-special.txt) on a remote server and we want it to be transferred on local machine we will use : ->
scp -i privatekey.pem ubuntu@dns of remote machine:/home/ubuntu/ashu/super-special.txt .where
:/home/ubuntu/ashu/super-special.txt-> is the path of file on remote machine. (SOURCE).-> denotes that transfer the file to the current directory of local machine.(DESTINATION)
systemctl (System Control)
systemctlis a command-line utility in Linux for controlling the systemd system and service manager.It is basically used to manage the services on machine like to -> start , stop, restart , status.
To start a service :
sudo systemctl start service_nameExample ->
sudo systemctl start dockerTo stop a service :
sudo systemctl stop service_nameExample ->
sudo systemctl stop dockerTo restart we use :
sudo systemctl restart service_nameTo enable the service to start on boot :
sudo systemctl enable service_nameTo disable the service to start on boot :
sudo systemctl disble service_nameTo check the status of the services :
systemctl status service_nameALTERNATIVELY WE CAN ALSO USE
Servicecommand for allservice docker statusservice docker startservice docker stopservice docker restart.
We can also use
journalctlcommand to see the logs of information about system and Services.Example ->
sudo journalctl -fu docker.service
4] grep , awk , sed , find
1}grep : ->
grepis used to search text or search the given file for lines containing a match to the specified strings or words. By default,grepprints the matching lines.It is used to find patterns and regular expressions.
Search for a string in a file :
grep "search_string" filenameExample ->
grep hello file.txt
To search recursively in all files of directory:
grep -r "string" dir/Example ->
grep -r error /home/ubuntu/log/It is case sensitive.

we get error as well as WARN.
To make the search case insensitive we use the command:
grep -i error /home/ubuntu/log
2} find
findis used to search for files and directories in a directory hierarchy.Find files by name :
find /path/to/search -name "filename"Example 1 ->
find /home/user -name "file.txt"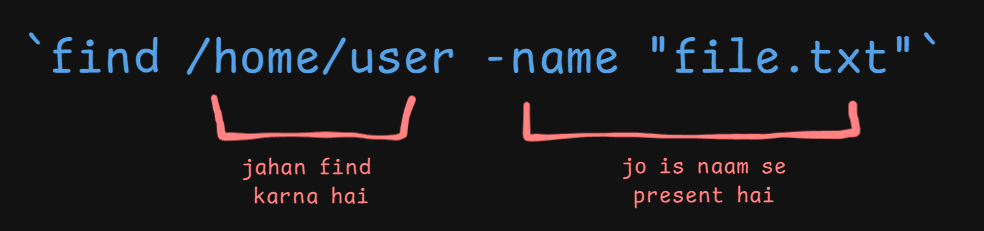
Example 2 -> it finds everything (used
*) that ends with.log
3}awk
awkis a powerful text-processing tool in Unix/Linux used for pattern scanning and processing. It can perform actions on lines that match a specified pattern.(awk vo hai jo aapke file me column wise iterate karta hai and jo aapko chiaye nikal ke deta hai)

Syntax ->
awk 'pattern { action }' input_filepattern: This specifies the condition that must be met for the action to be executed.
action: This is what you want to do when the pattern matches (e.g., print specific fields).
input_file: The file you are processing.
If no pattern is specified, AWK will apply the action to all lines in the input file.
Examples
Suppose we have this log file and we want to analyze this.(to tell anyone that which error occurred on which date/time/what was the error)

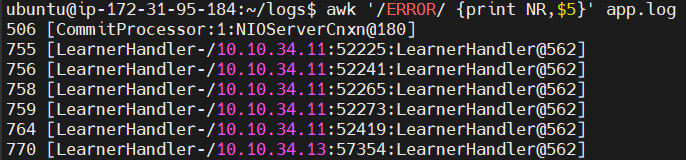
We want to print all the logs with the words ERROR in them .

When we want to Print all the ERROR logged lines only for ($1 ,$2 ,$3 ..etc) where $1 denotes the column.
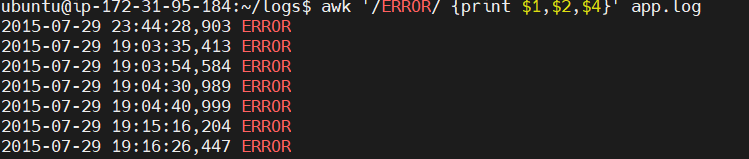
To print lines that contain the word "error":
awk '/error/ { print }' filename.txtTo print information of employees under the age of 40:
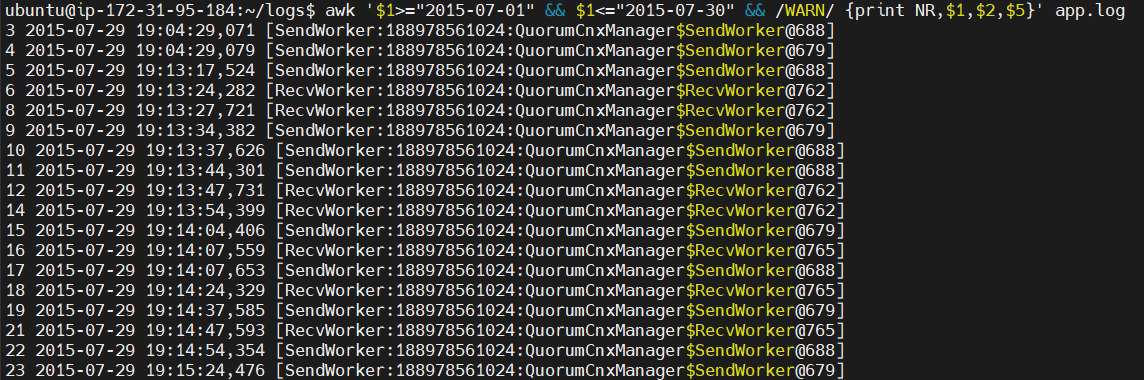
awk '$3 < 40 { print }' information.txtWe can also put conditions in awk like if we want only the logs before a specified date.
Like if we want to get the rows in which the error is present.
If we want to get the first 10 WARN logged lines with its message ,time and date.

If we want to get WARN logs between date 2015-07-01 -> 2015-07-30.
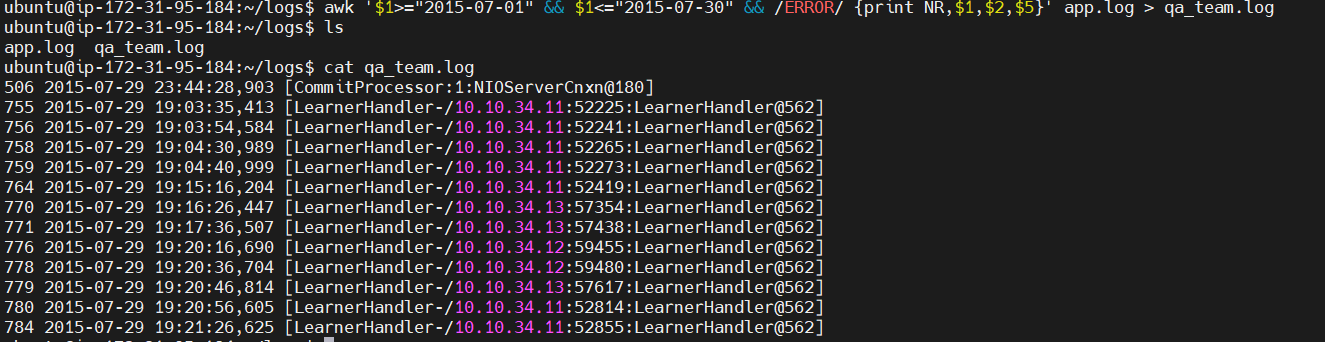
If we want to list the ERROR logs for the same and save it inside a file. It lists all the ERROR logged inside the file qa_team.log
Difference b/w grep and awk -> Grep is a simple tool for searching and displaying lines that match a pattern, while awk is a powerful text processing language that allows for pattern matching, data extraction, manipulation, and report generation.
Also for a file to be analyzed by awk the file should be space separated such that it can be divided in columns and searched.
4}sed
The
sedcommand, short for "stream editor," is a powerful Unix/Linux tool used for parsing and transforming text. It reads input line by line and applies a series of commands to each line, then outputs the result.Syntax is :
sed 'command' filename
Examples
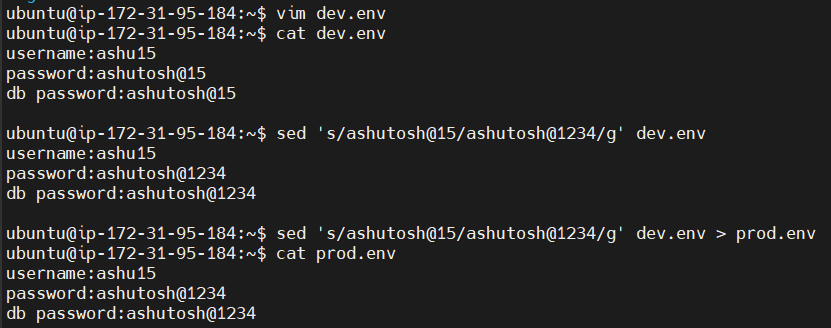
In this example i made a file named dev.env and filled in the details . I had to do the same for Prod.env but i just had to change the passwords
To replace the word only in 1st line we use :
sed '1s/cool/fool/' file.txtTo replace the first occurrence of "old" with "new" on each line: where s denotes string , old -> to be replaced and new -> replaced with `sed 's/old/new/' filename.txt
To replace all occurrences of "old" with "new" on each line: we add /g
sed 's/old/new/g' filename.txtTo delete lines containing a specific pattern, e.g., lines containing "delete": use /d
sed '/delete/d' filename.txtTo print only specific lines, e.g., line 2 to line 3:
sed -n '2,3p' filename.txtThis prints only line 2 and line 3
sed -n '1p' file.txt-> this prints only 1st line.
To insert text before a specific line, e.g., before line 2:
sed '2i\Inserted line' filename.txt
To append text after a specific line, e.g., after line 2:
sed '2a\Appended line' filename.txt
5] Volume Mounting
Volume mounting in Linux involves attaching a storage device (like a hard drive or USB drive) to a specific directory so that its contents can be accessed through the filesystem. Here’s how you can do it:
If we have a instance and we want to expand storage of the server we can do this by adding additional storage via AWS console.
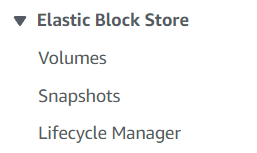
Step1 -> In Ec2/home go to Elastic Block Store -> Volume
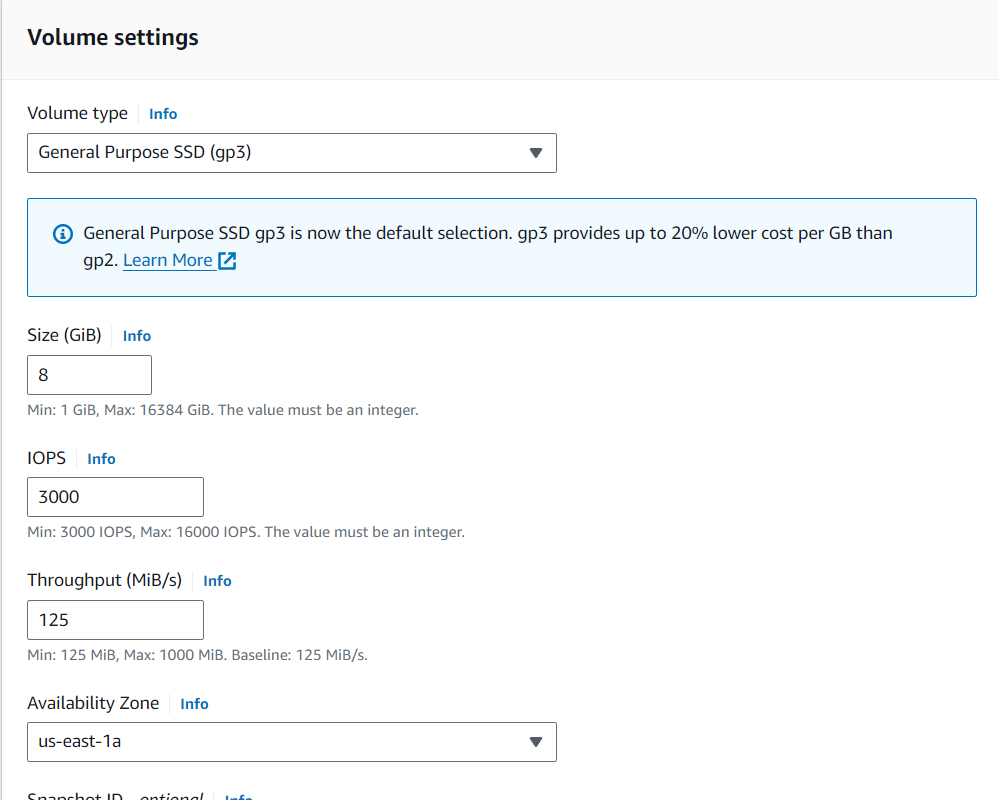
Step 2 (Creating Volume) -> Create Volume -> Select the appropriate Volume Settings.
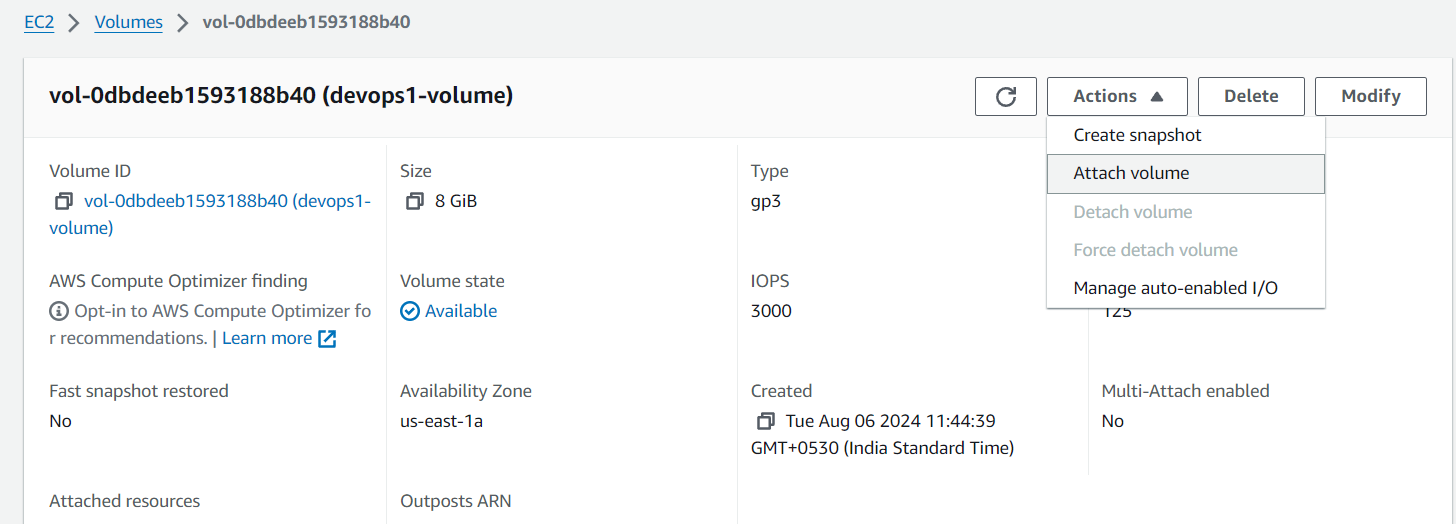
Step 3 (Attaching Volume to Ec2 instance) -> After Successfully creating the volume. The Volume is ready/available and is ready to be attached -> Click Attach in Actions menu and attach the volume by selecting the instance (to which the volume will be attached) and device name.
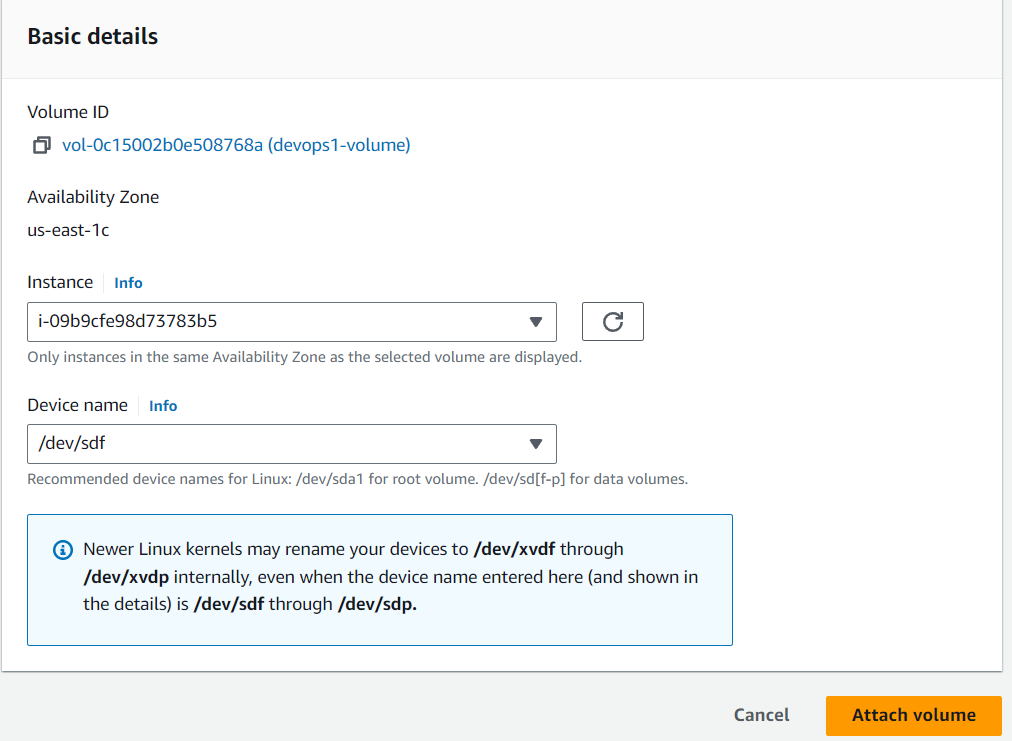
Now the volume becomes in use ->
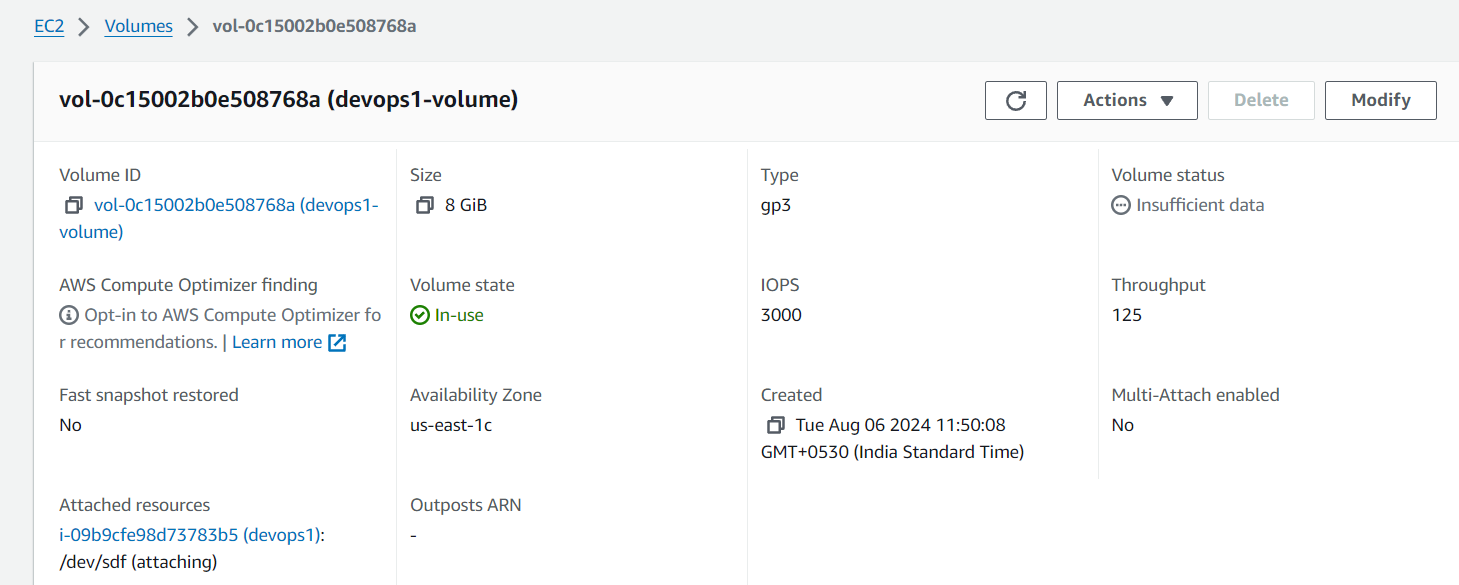
Step 4 (Attaching volume as a Block)-> Till this step we have only created a volume which is attached to our server/instance. Now to make it of use or to store files in it we have to mount the volume into our device.
This shows the current file system ->
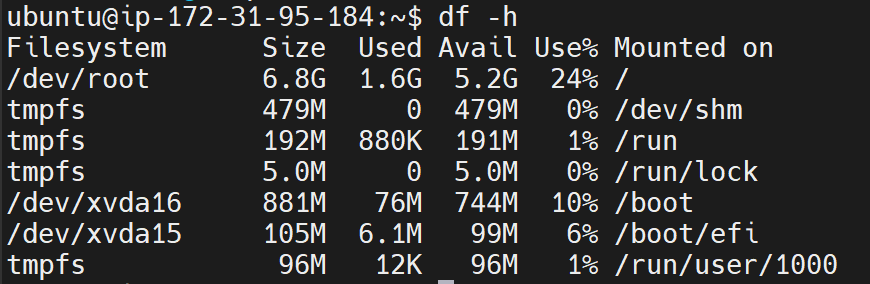
We don't have the volume that we created ,in the current file system , so we create an external filesystem for our disk file system using command :
sudo mkfs -t ext4 /dev/xvdf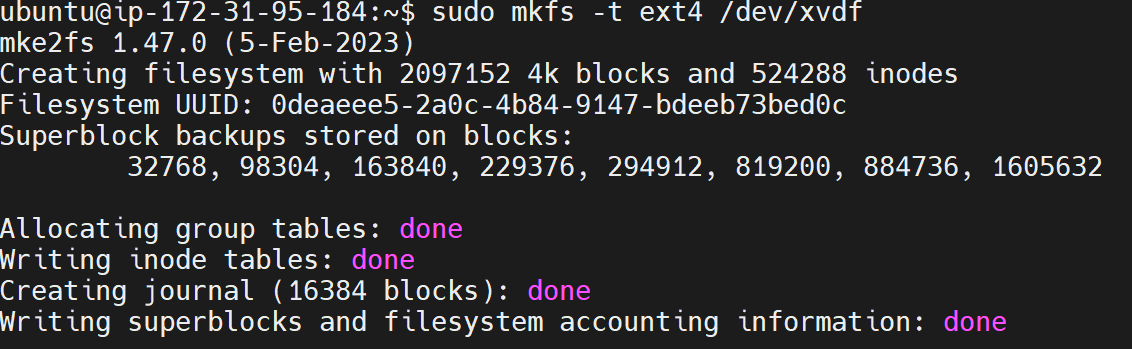
Now to see the attached volume (as a block) to the server we use command :
lsblk-> it will list all the blocks which are attached to the server.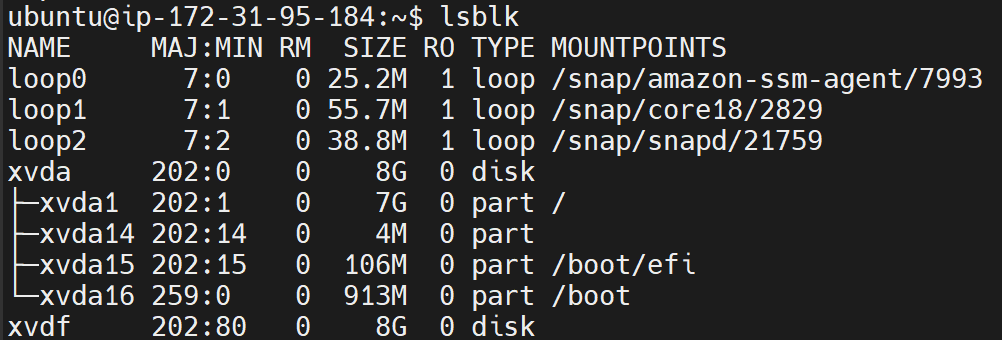
Step 4 (Mounting the Volume) -> Volume has been attached to the server as a block but in Linux every thing is either a file or a directory so we have to make ebs volume as a file system so that we can mount it on our server. To do that we use the command :
sudo file -s /dev/xvdf-> this command converts the ebs volume storage from block -> file system.
Now the volume can be mounted but first we have to create a path on which it can be mounted. We do this simply by making a folder.
sudo su-> normal user don't have permission to access mnt folder inside/mkdir /mnt/new_volume
Now finally mounting the ebs volume to server with command :
mount /dev/xvdf /mnt/new_volumeand then we see that the volume is successfully mounted.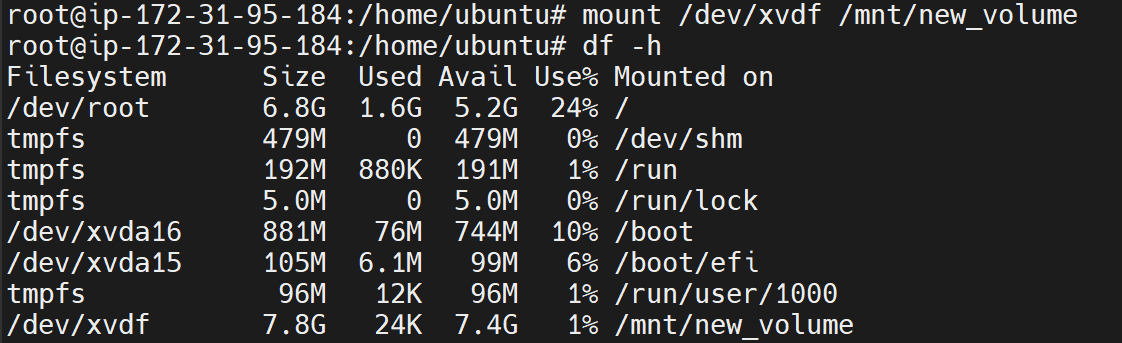
Summary
Create volume.
Attach Volume.
Convert volume (block) to file system.
Add path to be mounted on.
Mount the ebs Volume.